User guide
HED (Hierarchical Event Descriptors) is a framework for annotating behavioral, physiological, and other events in scientific data using standardized, machine-readable vocabulary organized in hierarchical tag trees. HED is used for human behavioral and neuroimaging experiments.
MATLAB HEDTools provides a convenient interface for MATLAB users to validate HED annotations, search and summarize events, remodel event data, perform factorization and data epoching, and integrate HED with MATLAB-based analysis workflows such as EEGLAB.
Installation
Downloading hed-matlab
MATLAB HEDTools can be downloaded from the hed-matlab GitHub repository.
Using Git:
git clone https://github.com/hed-standard/hed-matlab.git
Using zip download:
You can also download the latest release as a zip file from the hed-matlab releases tab on GitHub.
Setting up your MATLAB path:
Once you have downloaded (and unzipped if necessary), add the hedmat directory and all of its subdirectories to your MATLAB path:
myPath = 'xxx';  % This should be the full path to hedmat
addpath(genpath(myPath));
The following table describes the directories of this repository:
Directory |
Description |
|---|---|
|
Data used for the demos and tests. |
|
Source code for the documentation. |
|
MATLAB interface for the HED tools. |
|
Demos of calling the table remodeler. |
|
General purpose utilities. |
|
Demos of directly using the HED web services (without hedtools). |
|
Unit tests for MATLAB. (Execute |
Web services (no install)
The simplest way to use MATLAB HEDTools is through web services. This approach:
Requires no installation beyond downloading the MATLAB HEDTools package
Requires Internet access to connect to HED web services
Works immediately without any Python setup
Using Python directly
For more efficient operation and additional functionality, you can configure MATLAB to call the Python HEDTools directly. This approach:
Requires one-time Python setup (Python 3.10+, HEDTools package)
Provides better performance than web services
Works offline once configured
Provides access to additional features not available through web services
Some additional functionality not in the MATLAB HEDTools interface is directly accessible through Python
For Python installation instructions, see MATLAB Python install.
Quick example
Here’s a simple example to get you started with HED validation in MATLAB:
HED validation in MATLAB using web services
% Get HED tools using web services
hed = getHedTools('8.4.0', 'https://hedtools.org/hed');

% Validate a string containing HED tags
issues = hed.validateTags('Sensory-event,Red,(Image,Face)');

if isempty(issues)
    disp('HED string is valid!');
else
    disp(issues);
end
Tool overview
MATLAB HEDTools provide the following interface to HEDTools as explained in more detail in the following sections. The MATLAB HEDTools package provides two interchangeable implementations of these functions – calling the HED Python tools through a web service or directly calling the Python HEDTools.
To use HED tools, you first create a HED object by calling getHedTools. If you provide the optional host argument, the HED tools use services, otherwise direct calls to Python. Once created, you simply call the available methods using that reference. The process is summarized in the following diagram.
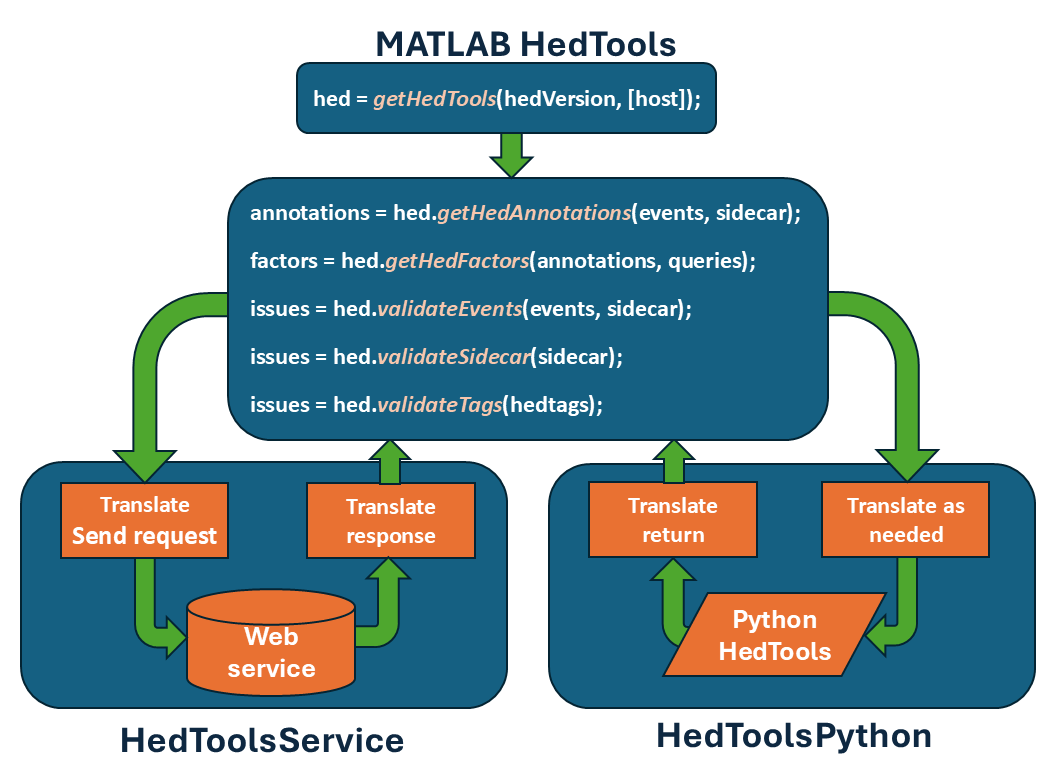
Both approaches take MATLAB data as input and translate these values as needed to access the HEDTools. After making the call, the implementation translates the results back into MATLAB data types. The MATLAB HedTools accept a variety of different types of MATLAB variables as input.
Another option is to use CTagger integration for HED. The EEGLAB plug-ins provide easy access through the EEGLAB GUI interface.
A third option is the EEGLAB HEDTools plugin which performs validation and epoching on EEG datasets.
MATLAB HEDTools interface
MATLAB HEDTools provide the following routines for accessing HED:
MATLAB function |
Parameters |
Returns |
|---|---|---|
|
|
cell array of |
|
|
n x m array of 1’s and 0’s |
|
|
|
|
|
|
|
|
|
* indicates optional Name-Value parameter
The parameters are defined as follows:
Parameter |
Description |
MATLAB type |
|---|---|---|
|
HED annotations (one for each event) |
cell array of |
|
Event file information or actual events |
|
|
JSON sidecar or dictionary with HED info |
|
|
A single HED annotation string |
|
|
HED query expressions |
Cell array of |
|
If true, check warnings (default true) |
|
|
If true, include event contexts (default true) |
|
|
If true, remove type variables (default true) |
|
|
If true, expand Def tags (default true) |
|
Using MATLAB HEDTools
This section gives some examples of using MATLAB HEDTools.
Getting a HEDTools object
MATLAB HEDTools are all called by getting a HedTools object and then making the calls through this object. Use the getHedTools function to get a HedTools object.
The following example gets a HedTools object using version 8.4.0 of the HED schema (standard vocabulary) and the webservice available at https://hedtools.org/hed.
Access HED tools through web services.
hed = getHedTools('8.4.0', 'https://hedtools.org/hed');
The first parameter is number of the HED version to use, and the second parameter is the URL of the web service. The hed returned by this call is HedToolsService, which implements the interface by calls to HED web services. The https://hedtools.org/hed is the primary server for the HED online tools. An alternative server for the web services is https://hedtools.org/hed_dev. This is the HED development server, which deploys the latest features.
If you have installed the HED Python tools, you can access the MATLAB HEDTools interface using direct calls to Python.
Access HED tools through direct Python calls.
hed = getHedTools('8.4.0');
If you call the `getHedTools` with only the HED version number parameter, `getHedTools` assumes you are using direct calls to Python and returns a `HedToolsPython` object. The MATLAB HEDTools interface calls and behavior are identical whether you use the services or direct calls. You must have the HED Python tools installed to use direct calls. See [MATLAB Python install](#matlab-python-install).

### Calling a tool

Once you have the HED tools object, you can use it to call the tools listed above as illustrated in the following example:

```{admonition} Validate a string containing HED tags.
---
class: tip
---

```matlab
issues = hed.validateTags('Sensory-event,Red,Blech,(Image,Banana)');
```
The issues is a printable char array. The HED tags string in the above example has two unrecognized tags: Blech and Banana. The call to validateTags produces the following issues message:
TAG_INVALID: 'Blech' in Blech is not a valid base hed tag.
TAG_INVALID: 'Banana' in Banana is not a valid base hed tag.
Input of events
Events are markers on the experimental timeline that indicate something of interest. One of HED’s primary purposes is to annotation event markers with usable metadata to assist in analysis.
Events are generally represented in a tabular input form with column names. Each row in such a table corresponds to information associated with one event marker.
row # |
onset |
latency |
type |
modifier |
|---|---|---|---|---|
1 |
8.5 |
851 |
show |
A2 |
2 |
8.9 |
891 |
show |
A5 |
3 |
9 |
901 |
resp |
key1 |
4 |
10 |
1001 |
resp |
key2 |
HED expects that event files have an onset column that provides the time in seconds of the event marker relative to the experimental timeline.
When this data is stored in a tab-separated value file called test.tsv, it can be read as:
Read a tab-separated value file into a char array.
events = fileread('test.tsv');
The same data can also be stored in MATLAB struct array:
Store events in a MATLAB struct array.
events(1) = struct('onset', 8.5, 'latency', 851, 'type', 'show', 'modifier', 'A2');
events(2) = struct('onset', 8.9, 'latency', 891, 'type', 'show', 'modifier', 'A5');
events(3) = struct('onset', 9, 'latency', 901, 'type', 'resp', 'modifier', 'key1');
events(4) = struct('onset', 10, 'latency', 1001, 'type', 'resp', 'modifier', 'key2');
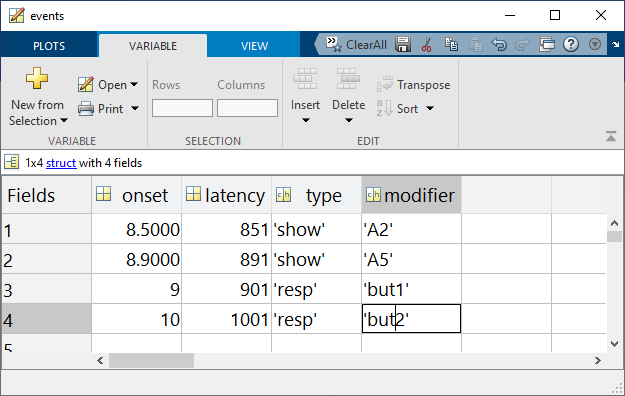
Displaying events on the MATLAB command line just gives the overall structure, but the MATLAB workspace editor provides a more informative view:
Once you have events data, it is easy to validate the HED associated with this data as shown by the following example:
Validate events data.
issues = hed.validateEvents(events, sidecar);
Input of sidecars
A tabular dataset may have a HED column whose entries provide HED annotations for the individual event markers represented by the rows. However, a more typical approach to annotation is to provide an additional dictionary, often called a sidecar. In BIDS the sidecar dictionaries are represented in JSON format. The MATLAB jsonencode and jsondecode translate various MATLAB data types into a JSON-compliant char value.
HED expects that sidecars will follow the BIDS format for sidecars associated with tabular files. The top-level JSON is a dictionary with keys that are the column names of the associated tabular file. Each key points to a dictionary of metadata for a column. One of the keys in this second dictionary can be HED as illustrated by the following example.
JSON sidecar for the events of previous section.
{
  "type": {
    "HED": {
      "show": "Sensory-presentation, Experimental-stimulus",
      "resp": "Agent-action, Participant-response"
    }
  },
  "modifier": {
    "HED": {
      "A2": "(Face, Image)",
      "A5": "(Animal/Horse, Image)",
      "key1": "(Press, (Left, Mouse-button))",
      "key2": "(Press, (Right, Mouse-button))"
    }
  }
}
Assembling HED annotations
The getHedAnnotations tool assembles the complete HED annotation for each event marker (i.e., each row in an event structure).
Assembling HED annotations.
annotations = hed.getHedAnnotations(events, sidecar);
Here annotations is a cell array with the same number of rows as events containing the char HED annotations for the events. The HEDTools look up the HED annotation for each element in a row of an events table and concatenate those together (comma-separated) to form the HED annotation for the event marker.
For the event data and sidecar defined in the previous sections, the sidecar provides HED annotations for the type and modifier columns. The resulting HED annotations for each row are given in the following table:
row |
HED annotation |
|---|---|
1 |
Sensory-presentation, Experimental-stimulus, (Face, Image) |
2 |
Sensory-presentation, Experimental-stimulus, (Animal/Horse, Image) |
3 |
Agent-action, Participant-response, (Press, (Left, Mouse-button)) |
4 |
Agent-action, Participant-response, (Press, (Right, Mouse-button)) |
The annotation for the first row consists of the HED tags for the show value in column type (i.e., Sensory-presentation, Experimental-stimulus) concatenated with the HED tags for the A2 value in column modifier (i.e., (Face, Image)). Note: HED annotations are unordered, so the tags may appear in any order. Use parentheses to group tags as appropriate.
The example annotations do not use any Def tags, so the replaceDefs option is not relevant. Users can give a name to particular string of HED tags using the Definition tag and then use the Def tag with that name as a shortcut in annotations. The Def tags are useful for tag strings that are frequently used and are required to define event processes. However, when assembling annotations to search for tags, you usually want to replace these shortcut Def tags with the actual HED tags they represent. Thus, the default value of replaceDefs is true. See Advanced annotation for details.
Since no special tags defining extended event processes are used (i.e., Onset, Offset, Duration) in the example annotations, the includeContext option has no effect in this example. If includeContext is true (the default) event processes contribute their tags to the Event-context of time markers that fall in their scope. See Advanced annotation for an explanation of this.
The example annotation does not contain any Condition-variable or Task tags, so removeTypesOn has no effect. Typically removeTypesOn should be true to remove the effects of these tags for ordinary assembly and searching as extraction of design matrices is a separate operation. See HED conditions and design matrices for additional information.
Searching HED annotations
The searchHed tool takes a cell array of n HED annotations and a cell array of m HED search queries and returns an n x m array of 1’s and 0’s indicating whether the annotations satisfy the queries.
Example search of HED annotations
factors = hed.searchHed(annotations, {'Sensory-event', 'Agent-action'});
The result of this query is the following:
Column 1 |
Column 2 |
|---|---|
1 |
0 |
1 |
0 |
0 |
1 |
0 |
1 |
The queries can be quite complex as described in the HED search guide.
MATLAB Python install
Although MATLAB began python support of python in 2014, you must be using MATLAB version 2020b or later with the HEDTools because the current version of the HEDTools requires Python 3.10 or later. See compatible version of Python for a listing of which Python versions are compatible with which versions of MATLAB.
Note: For your reference, the source for hedtools is the hed-python GitHub repository. The code is fully open-source with an MIT license. The actual API documentation is available here, but the tutorials and tool documentation for hedtools on HED Resources site provides more examples of use.
You will need at least MATLAB version R2022b, since the Python HEDTools require at least Python 3.10. See MathWorks Python compatibility Docs for additional information.
Installing Python
The greatest difficulty for users who are unfamiliar with Python is getting Python connected to MATLAB. Once that is done, many of the standard hedtools functions can be accessed through method call that take MATLAB variables and return either MATLAB variables or opaque objects that can be passed to other MATLAB functions.
Thus, once the setup is done, you don’t have to learn any Python syntax to use the tools. You should only have to do this setup once, since MATLAB retains the setup information from session to session.
Steps for setting up Python HEDtools for MATLAB.
Step 1: Find Python. If a version >= Python 3.10 is found, skip to Step 3.
Step 2: Install Python.
Step 3: Connect Python. If already connected, skip to Step 4.
Step 4: Install HEDtools
Step 1: Find Python
Follow these steps until you find a Python executable that is version 3.10 or greater. If you can’t locate one, you will need to install it.
Does MATLAB already have a good version of Python you can use?
In your MATLAB command window execute the following function:
>> pyenv
The following example response shows that MATLAB on Windows is using Python version 3.10 with executable located at C:\Program Files\Python\Python310\python.EXE.
If MATLAB has already knows about a suitable Python version that is at least 3.10, you are ready to go to Step 4: Install HEDTools. Keep track of the location of the Python executable.
If the pyenv did not indicate a suitable Python version, you will need to find the Python on your system (if there is one), or install your own.
There are several likely places to look for Python on your system.
For Linux users:
Likely places for system-space installation are
/bin,/local/bin,/usr/bin,/usr/local/bin, or/opt/bin. User-space installations are usually your home directory in a subdirectory such as~/binor~/.local/bin. Thewhich pythoncommand will list the Python executable that is first found in your path.
For Windows users:
Likely places for system-space installation are
C:\,C:\Python,C:\Program FilesorC:\Program Files\Python. User-space installations default to your personal account inC:\Users\yourname\AppData\Local\Programs\Python\python310whereyournameis your Windows account name andpython310will be the particular version (in this case Python 3.10).
If you don’t have any success finding a Python executable, you will need to install Python as described in Step 2: Install Python if you don’t have an appropriate version of Python already installed.
Otherwise, you can skip to Step 3: Connect Python.
Warning
You need to keep track of the path to your Python executable for Step 3.
Step 2: Install Python
If you don’t have Python on your system, you will need to install it. Go to Python downloads and pick the correct installer for your operating system and version.
Depending on your OS and the installer options you selected, Python may be installed in your user space or in system space for all users.
You should keep track of the directory that Python was installed in.
You may want to add the location of the Python executable to your system or user PATH.
Warning
MATLAB installs add-ons such as the HEDTools in a specific user directory as described below. This makes user-installed Python modules available to all MATLAB projects. For this reason, we do not recommend trying to set up a virtual environment.
Step 3: Connect Python
Setting the Python version uses the MATLAB pyenv function with the 'Version' argument as illustrated by the following example.
Example MATLAB function call connect MATLAB to Python.
>> pyenv('Version', 'C:\Program Files\Python\Python310\python.exe')
Be sure to substitute the path of the Python that you have found.
Use the MATLAB pyenv function again without arguments to check that your installation is as expected.
Step 4: Install HEDTools
The general-purpose package manager for Python is called pip. By default, pip retrieves packages to be installed from the PyPI package repository. You will need to use the version of pip that corresponds to the version of Python that is connected to MATLAB. The right version of pip is found in the Scripts subdirectory of your Python installation.
To install the latest released version of hedtools type a pip command such as the following in your MATLAB command window.
Command to install HEDTools in MATLAB.
system('"C:\Program Files\Python\Python310\Scripts\pip" install hedtools')
Use the full path of the pip associated with the Python that your MATLAB is using.
Giving the full path to correct version of pip ensures that MATLAB knows about HEDtools. (The version of Python that MATLAB is using may not be the same as the Python in the system PATH.)
Best practices
Web services vs Python
Use web services for:
Quick prototyping and testing
Simple validation tasks
Situations where Python installation is not feasible
Teaching or demonstrations
Use direct Python calls for:
Large-scale batch processing
Offline or air-gapped environments
Performance-critical applications
Advanced features not available through web services
Version management
Always specify the HED schema version explicitly in your code
Use the same HED schema version throughout a project
Document which HED schema version was used in your analysis
Check the changelog when upgrading versions
Error handling
Always check for validation issues before proceeding with analysis.
Validating an events file with sidecar
issues = hed.validateEvents(events, sidecar);
if ~isempty(issues)
    error('Validation failed:\n%s', issues);
end
Troubleshooting
Common issues
Problem: pyenv shows wrong Python version or empty
Solution: Set the Python version explicitly using pyenv('Version', '/path/to/python')
Problem: hedtools not found when using Python calls
Solution: Make sure you installed hedtools using the pip associated with the Python version MATLAB is using
Problem: Web service timeout or connection errors
Solution: Check your internet connection and firewall settings. Try the alternative server at https://hedtools.org/hed_dev
Problem: Validation reports unexpected errors
Solution: Verify you’re using the correct HED schema version for your dataset. Check the dataset’s dataset_description.json file for the HED version.
Getting help
Additional documentation resources:
API reference: Detailed MATLAB function documentation
HED specification: Formal annotation rules
HED resources: HED tutorials and guides
If you encounter issues not covered here:
Check GitHub issues to see if the problem is already reported.
If not, open a new issue with:
A clear, descriptive title
Detailed description of the problem
Steps to reproduce
Expected vs. actual behavior
MATLAB version and operating system
For HED-specific questions, see the HED resources site.
Funding
Partial support for this project was provided by NIH 1R01MH126700-01A1.
Development
This section provides instructions for contributors who want to develop MATLAB HEDTools code or build the documentation locally.
Environment setup
Prerequisites:
Python 3.10 or later
Git (to clone the repository)
Create virtual environment (recommended):
On Windows (PowerShell):
python -m venv .venv
.venv\Scripts\Activate.ps1
On Linux/macOS:
python -m venv .venv
source .venv/bin/activate
Install dependencies:
The development and documentation dependencies are defined in pyproject.toml. Install them using:
pip install -e .[dev,docs]
This installs all required packages including:
Documentation tools:
Sphinx (documentation generator)
Furo theme
MyST parser (for Markdown support)
sphinxcontrib-matlabdomain (for MATLAB code documentation)
sphinx-copybutton and other extensions
Development tools:
ruff (linter and formatter)
typos (spell checker)
mdformat (Markdown formatter)
Building the docs
From the repository root, run:
sphinx-build -b html docs docs/_build/html
The generated HTML documentation will be in docs/_build/html/. Open docs/_build/html/index.html in your browser to view it.
To rebuild from scratch (clean build):
sphinx-build -b html docs docs/_build/html -E
The -E flag forces a full rebuild of all files, ignoring the cache.
Modifying the docs
Edit Markdown files: Most documentation is written in Markdown (
.mdfiles) using the MyST parser.Rebuild documentation: After making changes, rebuild the docs to see your changes:
sphinx-build -b html docs docs/_build/html
Check for errors: Review the build output for any warnings or errors.
Preview changes: Open the generated HTML in your browser to verify your changes.
Documentation style guidelines
Use clear, descriptive headings following the hierarchy:
#for titles,##for sections,###for subsectionsInclude code examples with proper language tags (
```matlabfor MATLAB code)Use MyST directives for admonitions:
```{admonition}blocksLink to files using workspace-relative paths:
[text](path/file.md)Add index entries for important terms using
```{index} termblocksFollow the existing style in current documentation files
MATLAB code development
Running tests
The MATLAB unit tests are located in the tests/ directory. To run all tests:
Open MATLAB.
Add hedmat to your path:
addpath(genpath('hedmat'));
addpath(genpath('tests'));
Run the test suite:
run_tests
This executes all test files matching the pattern Test*.m in the tests/ directory.
Testing components
HED tools tests:
tests/test_hed_tools/Utilities tests:
tests/test_utilities/
To run tests for a specific component, navigate to the test directory and run the individual test file.
Code style guidelines
Use clear, descriptive function and variable names
Include comprehensive doc comments using
%%section markersFollow MATLAB naming conventions: camelCase for functions, UPPER_CASE for constants
Include examples in function documentation
Test your code with the unit test framework before submitting
Contributing workflow
Reporting issues
If you find a bug or have a feature request, see Getting help above for what to include when opening a GitHub issue.
Submitting changes
Fork the repository on GitHub.
Create a feature branch:
git checkout -b feature/your-feature-name
Make your changes:
Write clear, focused commits
Follow the code style guidelines
Add or update tests as needed
Update documentation if needed
Test your changes:
Run the MATLAB test suite
Build and review the documentation
Commit your changes:
git add .
git commit -m "Brief description of your changes"
Push to your fork:
git push origin feature/your-feature-name
Create a Pull Request on GitHub with:
Clear description of the changes
Reference to related issues (if any)
Any breaking changes or migration notes
Code review process
All contributions require review before merging
Be responsive to feedback and questions
Update your PR based on review comments
Maintain a clean commit history